ブロックチェーンのアプリ、Dappsを作るときのはじめの一歩となる開発環境の構築メモです。
フロントエンド、バックエンドともdockerを使っているので、ちょっと失敗してもやり直しが簡単です。
開発環境
MacOS Monterey Version 12.4
MacBook Pro 2020年に購入したもの。
node.js
以前インストールしたものを使用
バージョンは以下
# node -v
v18.3.0
docker
こちらも以前インストールしたdockerをそのまま使用
バージョンは以下の通り
% docker version
Client:
 Cloud integration: v1.0.22
 Version:           20.10.12
 API version:       1.41
 Go version:        go1.16.12
 Git commit:        e91ed57
 Built:             Mon Dec 13 11:46:56 2021
 OS/Arch:           darwin/arm64
 Context:           default
 Experimental:      true

Server: Docker Engine - Community
 Engine:
  Version:          20.10.12
  API version:      1.41 (minimum version 1.12)
  Go version:       go1.16.12
  Git commit:       459d0df
  Built:            Mon Dec 13 11:43:07 2021
  OS/Arch:          linux/arm64
  Experimental:     false
 containerd:
  Version:          1.4.12
  GitCommit:        7b11***************************5eb5d
 runc:
  Version:          1.0.2
  GitCommit:        v1.0.2-0-g52b36a2
 docker-init:
  Version:          0.19.0
  GitCommit:        de40ad0
ユーザディレクトリ配下にdocker用のディレクトリを作成
% mkdir -p ~/Dev/dockerこの下に更にフロントエンド用のdockerコンテナとバックエンド用のdockerコンテナそれぞれのディレクトリを作成する
% cd ~/Dev/docker
% mkdir nft-vote-front
% mkdir nft-vote-back
% ls -l
drwxr-xr-x   2 eibakatsu  staff   64  7 14 08:53 nft-vote-back
drwxr-xr-x   2 eibakatsu  staff   64  7 14 08:53 nft-vote-front
それぞれの環境用のdockerファイルを作成する
作業用ディレクトリも作成する
% touch nft-vote-front/docker-compose.yml      #フロントエンド用
% touch nft-vote-front/Dockerfile
% mkdir nft-vote-front/work_space
% touch nft-vote-back/docker-compose.yml      #バックエンド用
% touch nft-vote-back/Dockerfile
% mkdir nft-vote-back/work_space
テキストエディタで修正(自分はviコマンドで)
フロント用docker-compose.yml
version: '3'
services:
  nft_vote_front:
    container_name: nft_vote_front
    build: .
    ports:
      - "8080:8080"
    volumes:
      - "./work_space:/var/www/html"
    tty: true
以下、この後の起動コマンドで発生したエラーとその対応
- “:”(コロン)の後に空白が必要っぽい。空白なしだと「could not find expected ‘:’」のエラー発生。
- インデントは空白2つでキレイに整えないとダメっぽい。ずれていると「service must be a mapping, not a NoneType.」の発生。
フロントエンド用Dockerfile
FROM node:17-alpine3.14

WORKDIR /var/www/html

RUN apk update && \
    npm install -g npm && \
    npm install -g @vue/cli

EXPOSE 8080
ENV HOST 0.0.0.0
バックエンド用docker-compose.yml
version: '3'
services:
  nft_vote_back:
    container_name: nft_vote_back
    build: .
    ports:
      - 13040:3000
    volumes:
      - ./work_space:/var/hardhat
    tty: true
    environment:
      - TZ=Asia/Tokyo
    networks:
      - default

networks:
  default:
バックエンド用Dockerfile
FROM node:16.3-alpine

RUN apk update && \
  apk add git

RUN yarn install && yarn add -D \
  hardhat

WORKDIR /var/hardhat
作成した環境を作成して起動
% docker-compose -f ./nft-vote-front/docker-compose.yml up -d        #フロントエンド用
% docker-compose -f ./nft-vote-back/docker-compose.yml up -d        #バックエンド用
./nft-vote-front, .nft-vote-backのディレクトリ内でコマンド実行する場合、ファイル指定「-f ./nft-vote-front/docker-compose.yml」を省略可能。 *以降は作業ディレクトリ配下で実行している
作業ディレクトリを変更したい、などの理由で作り直したい場合は以下で一旦削除する。
作業ディレクトリ配下で実行。
% docker-compose down nft_vote_front      #フロントエンド用
% docker-compose down nft_vote_back      #バックエンド用
各環境への接続方法は以下の通り
フロントエンド
% docker-compose exec nft_vote_front shバックエンド
% docker-compose exec nft_vote_back sh参考までに、停止コマンドは以下の通り
% docker-compose down # 作業ディレクトリに移動してから実行する バックエンド(ブロックチェーン)
Hardhat
バックエンドの開発環境を作っていく。
まず前章で作成したバックエンド用のdockerコンテナにログインする。
% docker-compose exec nft_vote_back sh
/var/hardhat #
プロジェクトを初期化。全部デフォルトのままEnterでだけ”yes”を入力する
/var/hardhat # npm init
:
package name: (hardhat)
version: (1.0.0)
description:
entry point: (index.js)
test command:
git repository:
keywords:
author:
license: (ISC)
About to write to /var/hardhat/package.json:
:
:
Is this OK? (yes) yes
npm notice
npm installでHardhatをインストール
/var/hardhat # npm install --save-dev hardhatnpx hardhatコマンドを使ってHardHatプロジェクトを作成
選択肢は「Create an empty hardhat.config.js」を選択
/var/hardhat # npx hardhat
888    888                      888 888               888
888    888                      888 888               888
888    888                      888 888               888
8888888888  8888b.  888d888 .d88888 88888b.   8888b.  888888
888    888     "88b 888P"  d88" 888 888 "88b     "88b 888
888    888 .d888888 888    888  888 888  888 .d888888 888
888    888 888  888 888    Y88b 888 888  888 888  888 Y88b.
888    888 "Y888888 888     "Y88888 888  888 "Y888888  "Y888

Welcome to Hardhat v2.10.1

? What do you want to do? …
  Create a basic sample project
  Create an advanced sample project
  Create an advanced sample project that uses TypeScript
❯ Create an empty hardhat.config.js
  Quit
成功したら、以下のファイルが出来上がっている
ls -l で確認
/var/hardhat # ls -l
total 248
-rw-r--r--    1 root     root           256 Jul 15 12:41 package.json
-rw-r--r--    1 root     root        242275 Jul 15 12:41 package-lock.json
drwxr-xr-x  231 root     root          7392 Jul 15 12:41 node_modules
-rw-r--r--    1 root     root            99 Jul 15 12:44 hardhat.config.js
contractsディレクトリ、scriptsディレクトリを作成する
/var/hardhat # mkdir contracts
/var/hardhat # mkdir scripts
/var/hardhat # ls -l
total 248
drwxr-xr-x 2 root root 64 Jul 15 12:53 contracts
-rw-r--r-- 1 root root 99 Jul 15 12:44 hardhat.config.js
drwxr-xr-x 231 root root 7392 Jul 15 12:41 node_modules
-rw-r--r-- 1 root root 242275 Jul 15 12:41 package-lock.json
-rw-r--r-- 1 root root 256 Jul 15 12:41 package.json
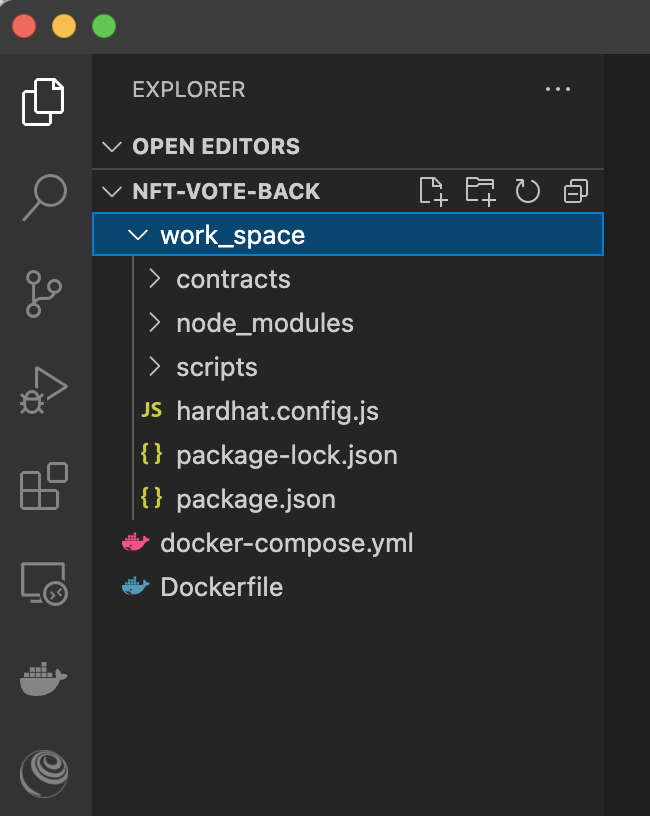
drwxr-xr-x 2 root root 64 Jul 15 12:53 scriptsVisualStudio Code
VisualStudio Codeでdockerでマウントされたフォルダを開く
~/Dev/doker/nft-vote-back
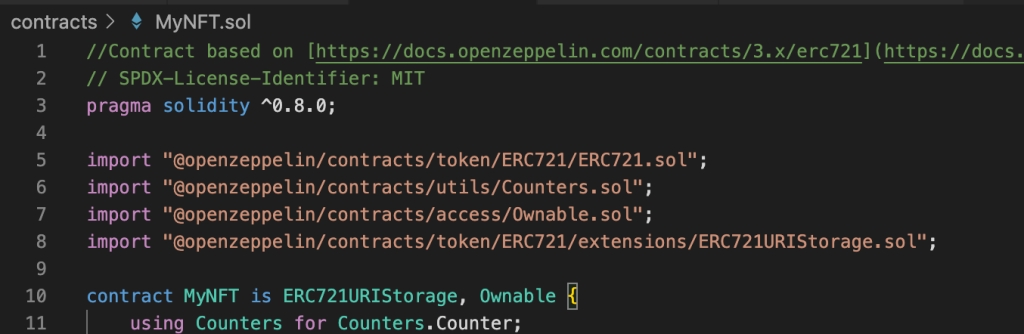
NFTのコントラクト(Solidityプログラム)を作成
OpenZeppelinをインストール
/var/hardhat # npm install @openzeppelin/contractscontractsフォルダ以下にMyNFT.solを作成
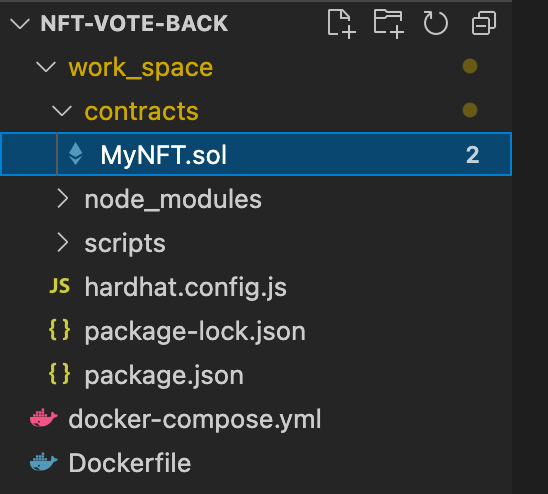
Ethereumのチュートリアルからプログラムをコピペする (STEP 10)
https://ethereum.org/en/developers/tutorials/how-to-write-and-deploy-an-nft/
//Contract based on 
 docs.openzeppelin.com(https://docs.openzeppelin.com/contracts/3.x/erc721)
// SPDX-License-Identifier: MIT
pragma solidity ^0.8.0;
import "@openzeppelin/contracts/token/ERC721/ERC721.sol";
import "@openzeppelin/contracts/utils/Counters.sol";
import "@openzeppelin/contracts/access/Ownable.sol";
import "@openzeppelin/contracts/token/ERC721/extensions/ERC721URIStorage.sol";
contract MyNFT is ERC721URIStorage, Ownable {
using Counters for Counters.Counter;
Counters.Counter private _tokenIds;
constructor() ERC721("MyNFT", "NFT") {}
function mintNFT(address recipient, string memory tokenURI)
public onlyOwner
returns (uint256)
{
_tokenIds.increment();
uint256 newItemId = _tokenIds.current();
_mint(recipient, newItemId);
_setTokenURI(newItemId, tokenURI);
return newItemId;
}
}
docs.openzeppelin.com(https://docs.openzeppelin.com/contracts/3.x/erc721)
// SPDX-License-Identifier: MIT
pragma solidity ^0.8.0;
import "@openzeppelin/contracts/token/ERC721/ERC721.sol";
import "@openzeppelin/contracts/utils/Counters.sol";
import "@openzeppelin/contracts/access/Ownable.sol";
import "@openzeppelin/contracts/token/ERC721/extensions/ERC721URIStorage.sol";
contract MyNFT is ERC721URIStorage, Ownable {
using Counters for Counters.Counter;
Counters.Counter private _tokenIds;
constructor() ERC721("MyNFT", "NFT") {}
function mintNFT(address recipient, string memory tokenURI)
public onlyOwner
returns (uint256)
{
_tokenIds.increment();
uint256 newItemId = _tokenIds.current();
_mint(recipient, newItemId);
_setTokenURI(newItemId, tokenURI);
return newItemId;
}
}

alchemy
以下のサイトでアカウントを作成する
https://alchemy.com/signup/eth
ECOSYSTEMはEthereumを選択
Team Name, App Nameは適当に入力し、NetworkはテストネットのRinkebyを選択
クレジットカード入力、Tweetはスキップ
完了したら以下の画面
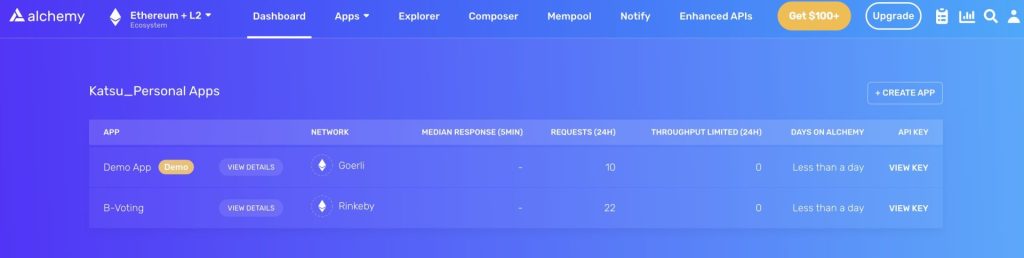
この画面の左下に、API KEY、HTTPS、WEBSOCKETSが記載されており、これを後ほど利用する。
DOTENV
環境変数をファイル指定できるようにする
/var/hardhat # npm install dotenvプロジェクトルートに.envファイルを作成し、以下の内容を記載
API_URL="[AlchemyのHTTPS]"
PRIVATE_KEY="[Metamaskの秘密鍵]"
Ether.js
HardhatでEthers.jsを統合
/var/hardhat # npm install --save-dev @nomiclabs/hardhat-ethers ethers@^5.0.0hardhat.config.js
以下のように書き換え
/** @type import('hardhat/config').HardhatUserConfig */
// module.exports = {
//   solidity: "0.8.9",
// };

require("@nomiclabs/hardhat-ethers");
const { API_URL, PRIVATE_KEY } = process.env;
module.exports = {
  solidity: "0.8.1",
  defaultNetwork: "rinkeby",
  networks: {
      hardhat: {},
      rinkeby: {
        url: API_URL,
        accounts: [`0x${PRIVATE_KEY}`]
      }
  },
}
コントラクトのコンパイル
/var/hardhat # npx hardhat compile
Downloading compiler 0.8.1
Compiled 13 Solidity files successfully
コントラクトのデプロイ
scriptフォルダ以下にdeploy.jsを作成
async function main() {
  const MyNFT = await ethers.getContractFactory("MyNFT")

  // Start deployment, returning a promise that resolves to a contract object
  const myNFT = await MyNFT.deploy()
  await myNFT.deployed()
  console.log("Contract deployed to address:", myNFT.address)
}
main()
  .then(() => process.exit(0))
  .catch((error) => {
    console.error(error)
    process.exit(1)
  })
デプロイしたらエラー。資金が足りないと。
/var/hardhat # npx hardhat run scripts/deploy.js
Error: insufficient funds for intrinsic transaction cost [ See: https://links.ethers.org/v5-errors-INSUFFICIENT_FUNDS ] (error={"name":"ProviderError","code":-32000,"_isProviderError":true}, method="sendTransaction", transaction=undefined, code=INSUFFICIENT_FUNDS, version=providers/5.6.8)
at Logger.makeError (/var/hardhat/node_modules/@ethersproject/logger/src.ts/index.ts:261:28)
at Logger.throwError (/var/hardhat/node_modules/@ethersproject/logger/src.ts/index.ts:273:20)
at checkError (/var/hardhat/node_modules/@ethersproject/providers/src.ts/json-rpc-provider.ts:98:16)
at /var/hardhat/node_modules/@ethersproject/providers/src.ts/json-rpc-provider.ts:258:24
at processTicksAndRejections (node:internal/process/task_queues:96:5) {
reason: 'insufficient funds for intrinsic transaction cost',
code: 'INSUFFICIENT_FUNDS',
error: ProviderError: insufficient funds for gas * price + value
at HttpProvider.request (/var/hardhat/node_modules/hardhat/src/internal/core/providers/http.ts:78:19)
at LocalAccountsProvider.request (/var/hardhat/node_modules/hardhat/src/internal/core/providers/accounts.ts:182:36)
at processTicksAndRejections (node:internal/process/task_queues:96:5)
at EthersProviderWrapper.send (/var/hardhat/node_modules/@nomiclabs/hardhat-ethers/src/internal/ethers-provider-wrapper.ts:13:20),
method: 'sendTransaction',
transaction: undefined
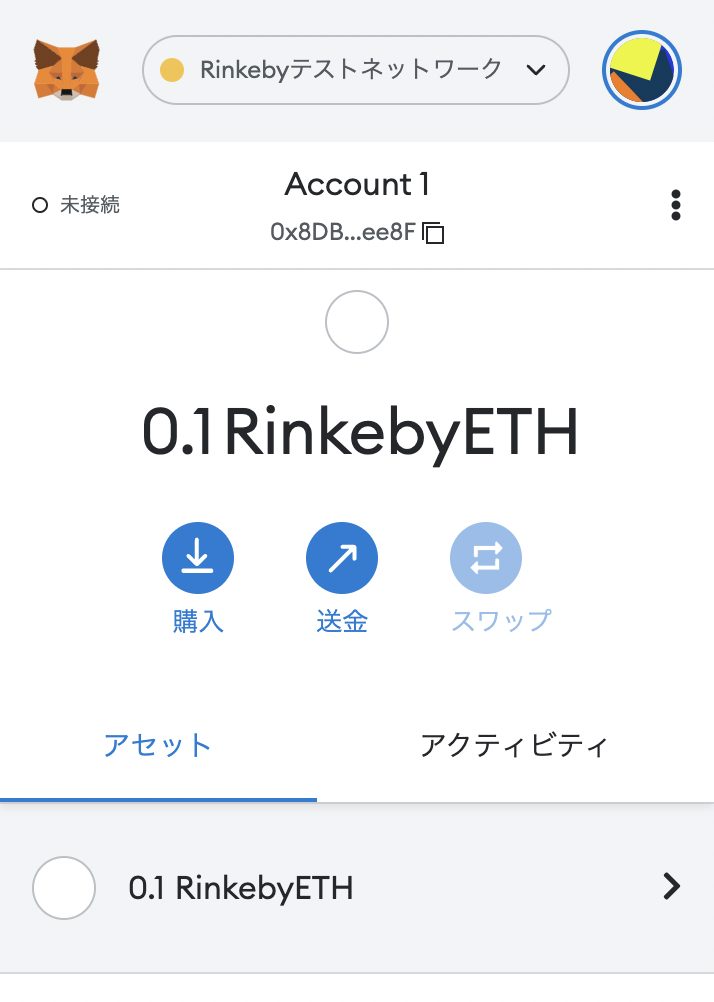
}テスト用のETHを貰えるサイトで資金を補充する。
https://rinkebyfaucet.com/
ウォレットアドレスを入力して「Send Me ETH」をクリックするだけ。
0.1 RinkebyETHがウォレットに送金される。
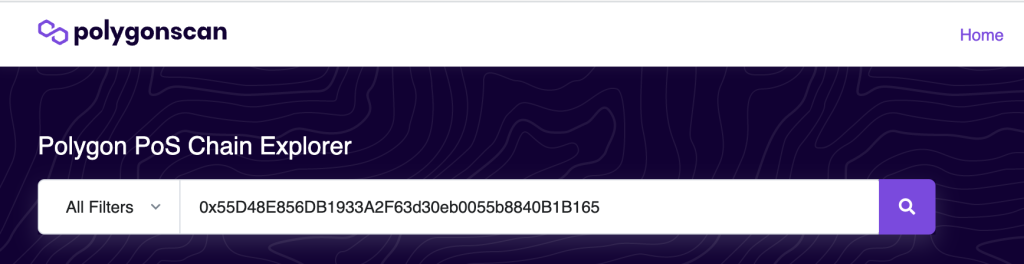
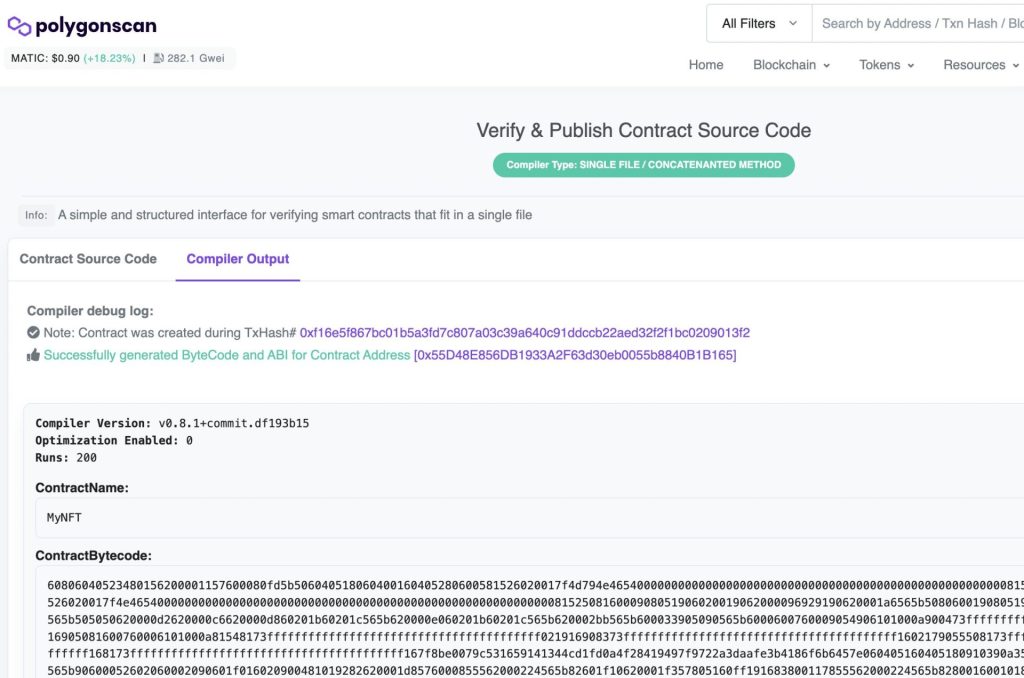
再度デプロイ。今度はうまく行った。
/var/hardhat # npx hardhat run scripts/deploy.js
Deploying contracts with the account: 0x8DBb35af7BF5E462715046A44806f7F46bd6ee8F
Account balance: 100000000000000000
Contract deployed to address: 0x55D48E856DB1933A2F63d30eb0055b8840B1B165
コントラクトのVerify
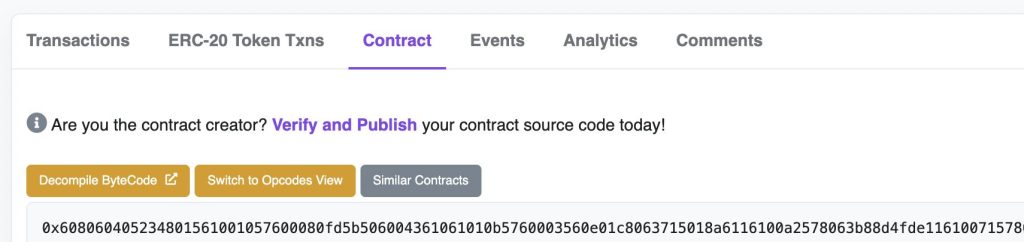
前準備
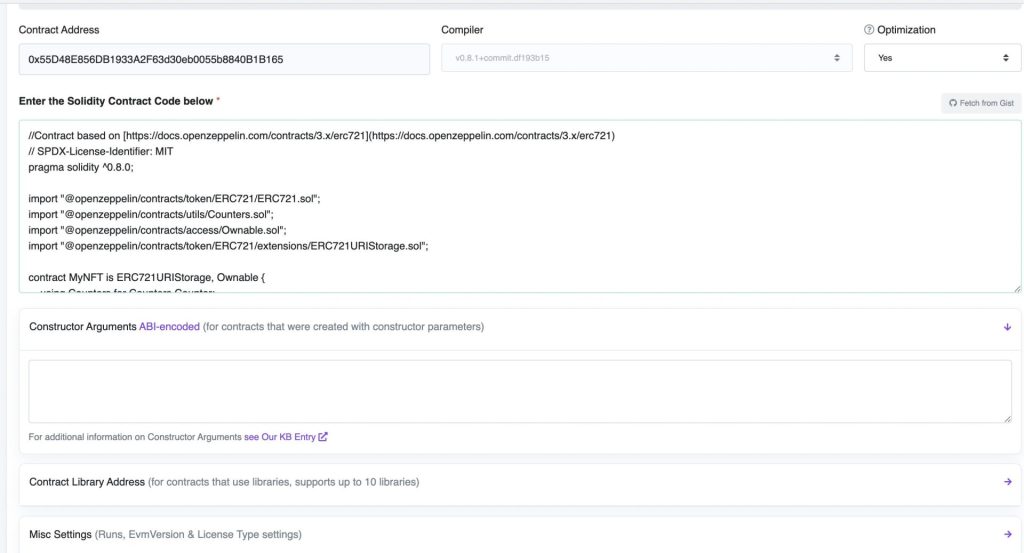
Verifyする 際にソースコードを指定するが、ソースコード内に import があるとエラーになってしまう。
解決できなかったので、flattenというコマンドで一つのソースコードに統合した。
/var/hardhat # npx hardhat flatten > flattened.solルートディレクトリ直下にflatttend.solというファイルができる。
この中は、importで指定したコードが順に並んでいるが、このままだとまだエラーになる。
“SPDX-License-Identifier: “でライセンス種別を指定するラインが複数個になってしまうためらしい。
解決策として、最初のSPDX-License-Identifier: 以外、”SPDX-License-Identifier:”を”SPDX-License-Identifier_:”に変更する。(正しい方法か不明。。)
// SPDX-License-Identifier: MIT
↓
// SPDX-License-Identifier_: MIT
Verify
Rinkebyのetherscanを開き、前項のデプロイで発行されたアドレスで検索する
https://rinkeby.etherscan.io/
Contractタブを開いて、「Verify and Publish」をクリックする
ログイン画面に遷移するので、アカウントを持っている場合はログイン、持っていない場合はSign Upする。
ログイン後、Verify画面
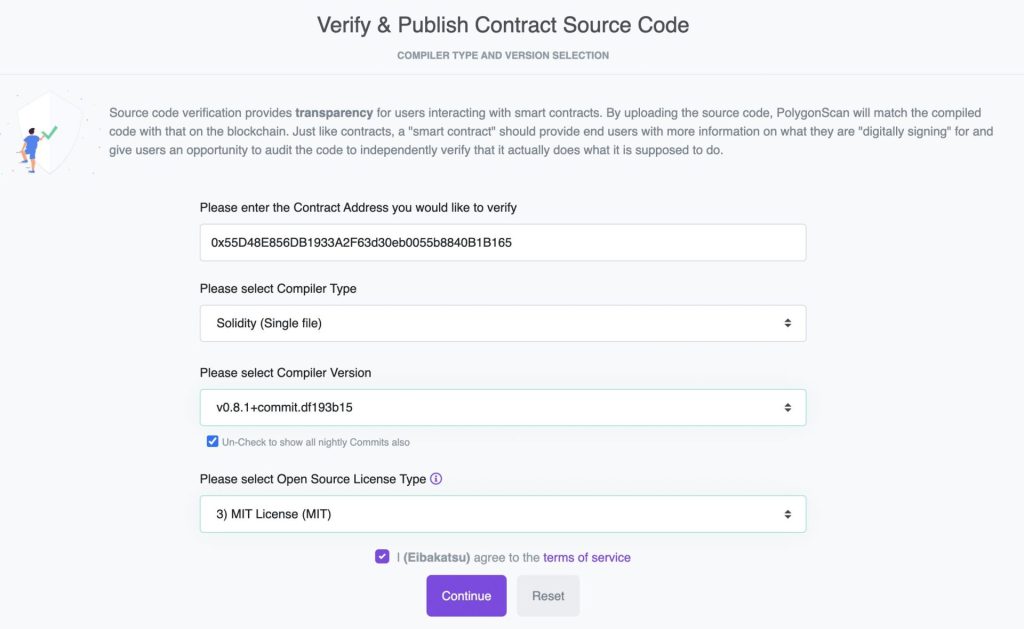
Compiler Versionはコンパイル時に指定したバージョン
Optimizationは”No” (イメージでは”Yes”になっているけど…)
Contract Codeは、前準備で編集したflattened.sol のコードをコピぺ
ABI-encodedは、よく理解していないのでとりあえず空白のまま
「私はロボットではありません」をチェックして、「Verify and Publish」をクリック
しばらく待つと、無事完了。
Pinata
ipfsにNFTに使用する画像とメタデータを登録しておく
https://www.pinata.cloud/ に Sign Up
Sign Up後、まず画像ファイルをアップロード。今回はcryptoninja.pngを登録。

二つ目の項目、CIDをメモしておく。
QmVqiUqqPsV7E5rb8Fe9QrHnttdmNdRBAmvd7JXFqD49JD
メタデータは、ルートディレクトリにnft-metadata.json というファイルを作成する
{
    "attributes": [
      {
        "trait_type": "t1",
        "value": "aaa"
      },
      {
        "trait_type": "t2",
        "value": "bbb"
      }
    ],
    "description": "This is test",
    "image": "ipfs://QmVqiUqqPsV7E5rb8Fe9QrHnttdmNdRBAmvd7JXFqD49JD",
    "name": "Ramesses"
  }
attributes はNFTの属性。今回は適当に設定した。
imageのipfs://に続く文字列は、最初にアップロードした画像ファイルのCID
これも画像ファイルと同じようにアップロードする
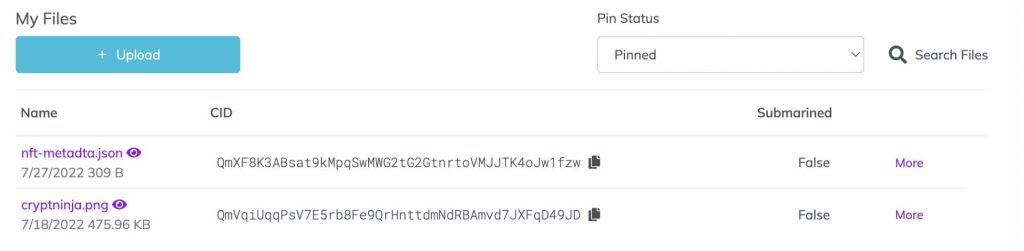
nft-metadata.json のCIDをメモとしておく
QmXF8K3ABsat9kMpqSwMWG2tG2GtnrtoVMJJTK4oJw1fzw
フロントエンド
フロントエンドの開発環境を作っていく。
dockerの章で作成したフロントエンド用のdockerコンテナにログインする。
% cd ~/Dev/docker/nft-vote-front
% docker-compose exec nft_vote_front sh
/var/www/html #
vue
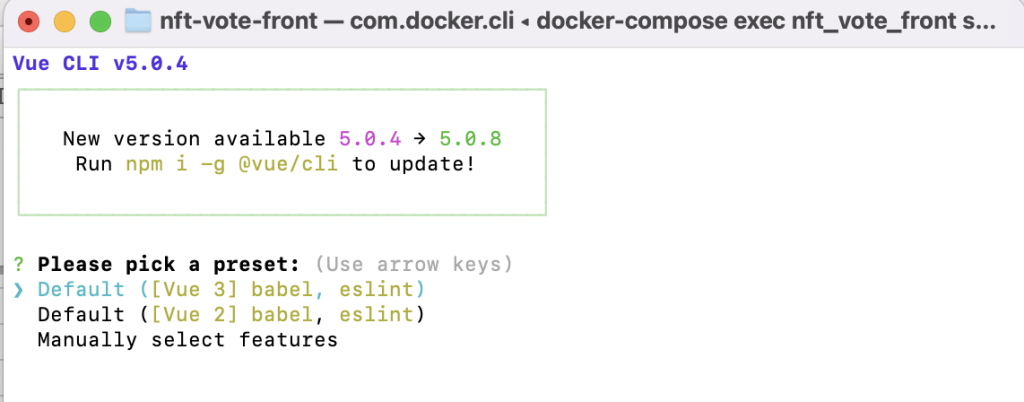
vueプロジェクトを作成
/var/www/html # vue create nft-vote-frontVue 3 を選択
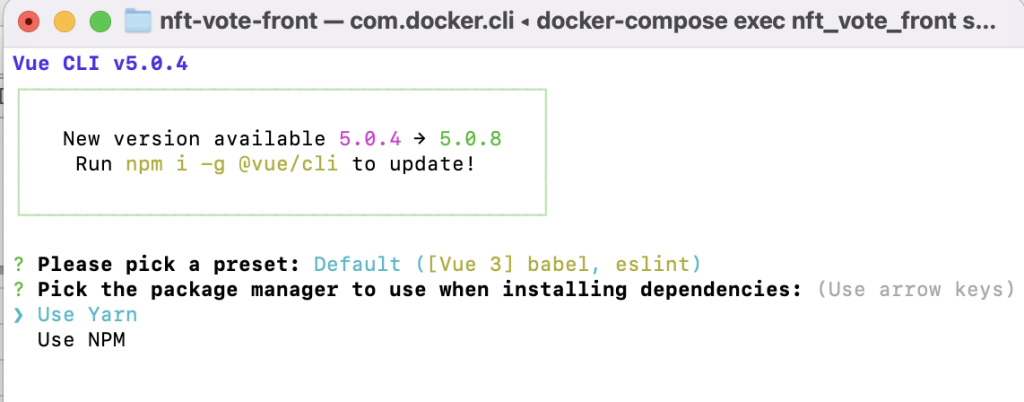
Yarnを選択
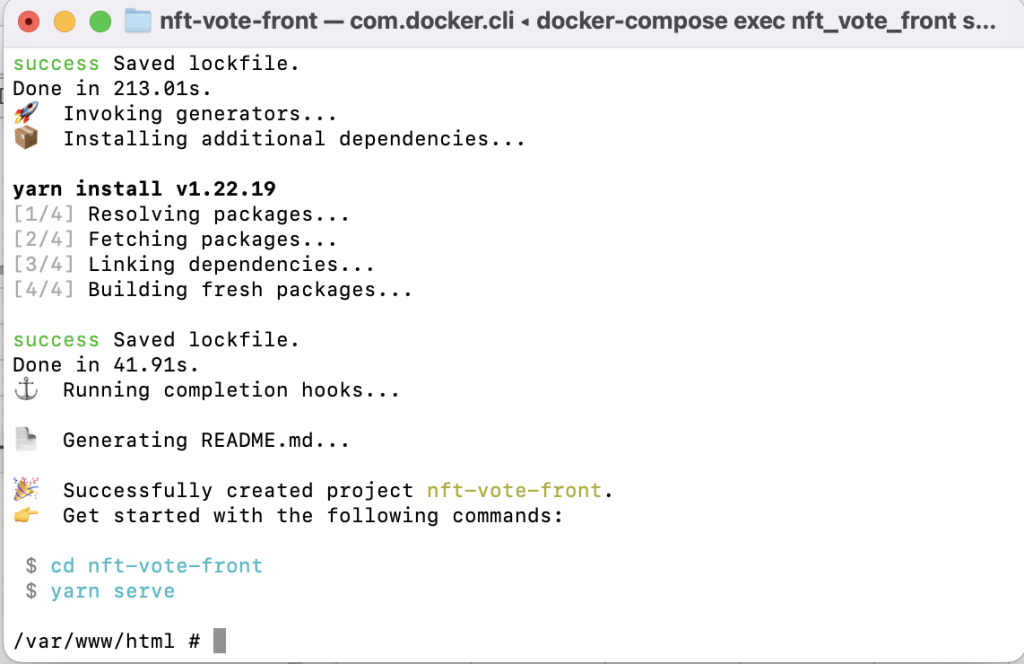
しばらく待つと完了する
作成したVueプロジェクトのディレクトリに移動後、ローカル開発用サーバを起動
/var/www/html # cd nft-vote-front/
/var/www/html/nft-vote-front # npm run serve

> nft-vote-front@0.1.0 serve
> vue-cli-service serve

 INFO  Starting development server...

 DONE  Compiled successfully in 10852ms                               3:25:52 PM

  App running at:
  - Local:   http://localhost:8080/
  - Network: http://172.22.0.2:8080/

  Note that the development build is not optimized.
  To create a production build, run yarn build.
http://localhost:8080/ にアクセスして下のページが表示されれば成功
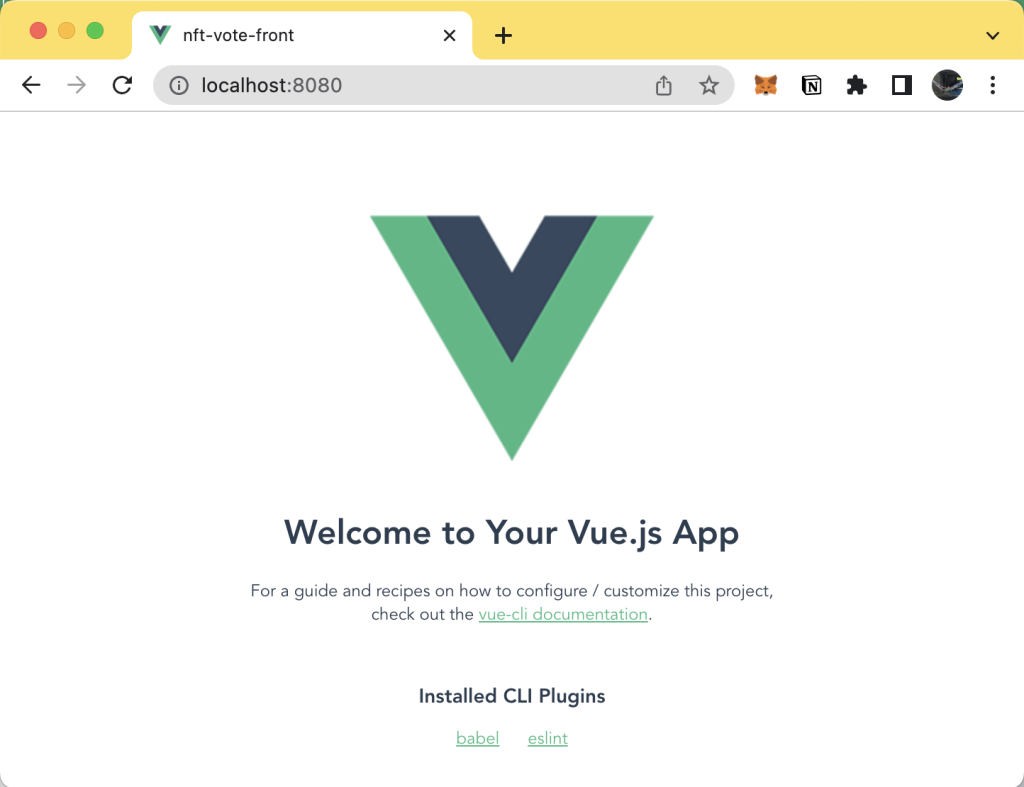
確認できてら、Control + C でローカル開発サーバをストップ
vuetify
vueにvuetifyを追加
/var/www/html/nft-vote-front # vue add vuetifyもう一度ローカル開発サーバを起動してアクセス
/var/www/html/nft-vote-front # npm run serve青いアイコンになり、メッセージもVuetifyになった
確認できてら、Control + C でローカル開発サーバをストップ
vue-router
Vue3と互換性のある Vue-Router4 をインストールする
/var/www/html/nft-vote-front # npm install vue-router@4package.jsonの中身は以下の感じになった
:
  "dependencies": {
    "@mdi/font": "5.9.55",
    "core-js": "^3.8.3",
    "roboto-fontface": "*",
    "vue": "^3.2.13",
    "vue-router": "^4.1.2",
    "vuetify": "^3.0.0-beta.0",
    "webfontloader": "^1.0.0"
  },
:
ミント用のページを作成する
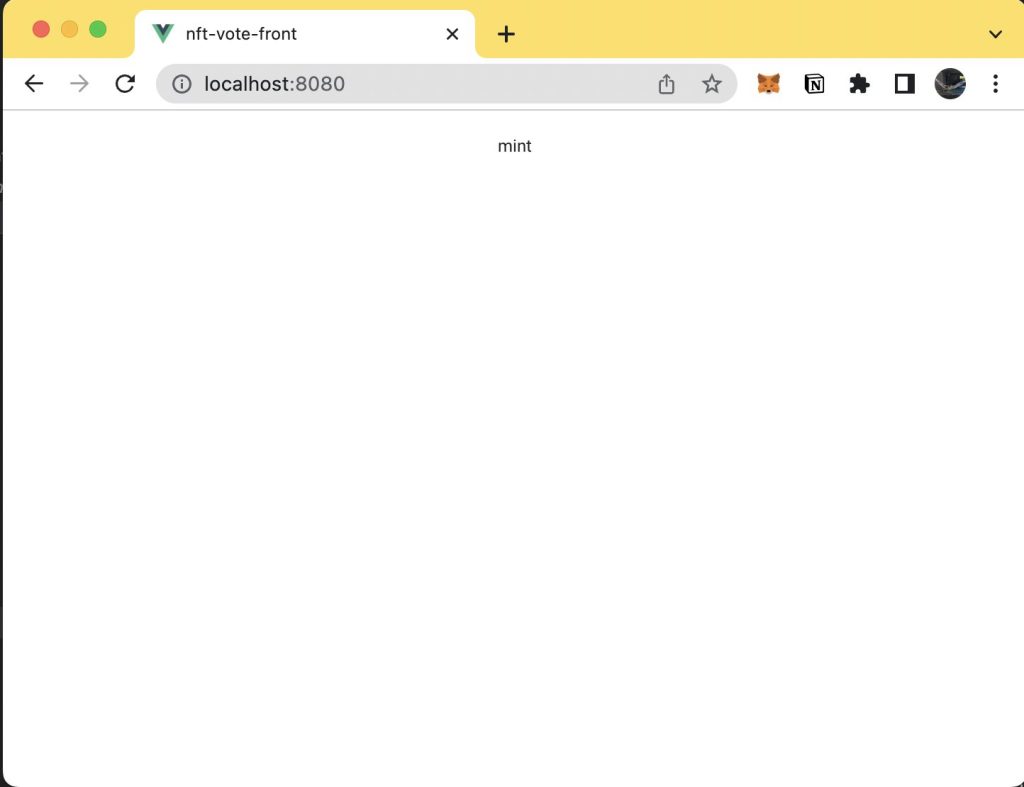
Compornentsディレクトリの配下に MintNft.vue を作成する
この段階では mint と表示するのみ。
<template>
    <v-container>
        <v-row class="text-center">
            <v-col cols="12">
                mint
            </v-col>
        </v-row>
    </v-container>
</template>

<script>
export default {
  name: 'MintNft',

  data: () => ({
    //
  }),
}
</script>
srcディレクトリの配下にrouterというディレクトリを作成して、その配下にindex.jsファイルを作成。index.jsファイルにルーティング情報を記載する
import { createRouter, createWebHistory } from 'vue-router'
import HelloWorld from '@/components/HelloWorld.vue'
import MintNft from '@/components/MintNft.vue'

const routes = [
  {
    path: '/',
    name: 'mint',
    component: MintNft
  },
  {
    path: '/helloWorld',
    name: 'helloWorld',
    component: HelloWorld
  }
]

const router = createRouter({
  history: createWebHistory(process.env.BASE_URL),
  routes
})

export default router
main.js に vue-router 呼び出しを追加
import { createApp } from 'vue'
import App from './App.vue'
import vuetify from './plugins/vuetify'
import { loadFonts } from './plugins/webfontloader'
import router from './router/index'   // ★追加★

loadFonts()

createApp(App)
  .use(vuetify)
  .use(router)  // ★追加★
  .mount('#app')
App .vue からHelloWorldを呼び出す方法を vue-router 経由に変更
<template>
  <v-app>
    <!-- ★コメントアウト★
    <v-main>
      <HelloWorld/>
    </v-main> -->
    <router-view />  <!-- ★追加 -->>
  </v-app>
</template>

<script>
// import HelloWorld from './components/HelloWorld.vue'  // ★コメンアウト★

export default {
  name: 'App',

  // components: { // ★コメンアウト★
  //   HelloWorld, // ★コメンアウト★
  // }, // ★コメンアウト★
</span>
  data: () => ({
    //
  }),
}
</script>
ローカル開発サーバを起動して、mintと表示されていたらOK
プロジェクトのファイル構成は以下の通りになっている

DOTENV
Vueには最初からDOTENVがインストールされている
プロジェクトルートに.envファイルを作成し、以下の内容を記載
* キーのプレフィックスには VUE_APP_ をつけないといけない
VUE_APP_CONTRACT _ADDRESS=[[コントラクトのデプロイ]で取得したアドレスを指定]ether.js
ethers.jsをインストール
/var/www/html/nft-vote-front # npm install --save ethersMINT処理
プロジェクトルート配下に contractディレクトリを作成し、その配下に connectContract.js を作成する
// ethersをインポート
import { ethers } from "ethers"

// デプロイしたコントラクトアドレス
const contractAddress = process.env.VUE_APP_CONTRACT_ADDRESS
// コントラクトアドレスのABI. polygonscanからコピペ
const contractAbi = '[{"inputs":[],"stateMutability":"nonpayable","type":"constructor"},{"anonymous":false,"inputs":[{"indexed":true,"internalType":"address","name":"owner","type":"address"},{"indexed":true,"internalType":"address","name":"approved","type":"address"},{"indexed":true,"internalType":"uint256","name":"tokenId","type":"uint256"}],"name":"Approval","type":"event"},{"anonymous":false,"inputs":[{"indexed":true,"internalType":"address","name":"owner","type":"address"},{"indexed":true,"internalType":"address","name":"operator","type":"address"},{"indexed":false,"internalType":"bool","name":"approved","type":"bool"}],"name":"ApprovalForAll","type":"event"},{"anonymous":false,"inputs":[{"indexed":true,"internalType":"address","name":"previousOwner","type":"address"},{"indexed":true,"internalType":"address","name":"newOwner","type":"address"}],"name":"OwnershipTransferred","type":"event"},{"anonymous":false,"inputs":[{"indexed":true,"internalType":"address","name":"from","type":"address"},{"indexed":true,"internalType":"address","name":"to","type":"address"},{"indexed":true,"internalType":"uint256","name":"tokenId","type":"uint256"}],"name":"Transfer","type":"event"},{"inputs":[{"internalType":"address","name":"to","type":"address"},{"internalType":"uint256","name":"tokenId","type":"uint256"}],"name":"approve","outputs":[],"stateMutability":"nonpayable","type":"function"},{"inputs":[{"internalType":"address","name":"owner","type":"address"}],"name":"balanceOf","outputs":[{"internalType":"uint256","name":"","type":"uint256"}],"stateMutability":"view","type":"function"},{"inputs":[{"internalType":"uint256","name":"tokenId","type":"uint256"}],"name":"getApproved","outputs":[{"internalType":"address","name":"","type":"address"}],"stateMutability":"view","type":"function"},{"inputs":[{"internalType":"address","name":"owner","type":"address"},{"internalType":"address","name":"operator","type":"address"}],"name":"isApprovedForAll","outputs":[{"internalType":"bool","name":"","type":"bool"}],"stateMutability":"view","type":"function"},{"inputs":[{"internalType":"address","name":"recipient","type":"address"},{"internalType":"string","name":"tokenURI","type":"string"}],"name":"mintNFT","outputs":[{"internalType":"uint256","name":"","type":"uint256"}],"stateMutability":"nonpayable","type":"function"},{"inputs":[],"name":"name","outputs":[{"internalType":"string","name":"","type":"string"}],"stateMutability":"view","type":"function"},{"inputs":[],"name":"owner","outputs":[{"internalType":"address","name":"","type":"address"}],"stateMutability":"view","type":"function"},{"inputs":[{"internalType":"uint256","name":"tokenId","type":"uint256"}],"name":"ownerOf","outputs":[{"internalType":"address","name":"","type":"address"}],"stateMutability":"view","type":"function"},{"inputs":[],"name":"renounceOwnership","outputs":[],"stateMutability":"nonpayable","type":"function"},{"inputs":[{"internalType":"address","name":"from","type":"address"},{"internalType":"address","name":"to","type":"address"},{"internalType":"uint256","name":"tokenId","type":"uint256"}],"name":"safeTransferFrom","outputs":[],"stateMutability":"nonpayable","type":"function"},{"inputs":[{"internalType":"address","name":"from","type":"address"},{"internalType":"address","name":"to","type":"address"},{"internalType":"uint256","name":"tokenId","type":"uint256"},{"internalType":"bytes","name":"data","type":"bytes"}],"name":"safeTransferFrom","outputs":[],"stateMutability":"nonpayable","type":"function"},{"inputs":[{"internalType":"address","name":"operator","type":"address"},{"internalType":"bool","name":"approved","type":"bool"}],"name":"setApprovalForAll","outputs":[],"stateMutability":"nonpayable","type":"function"},{"inputs":[{"internalType":"bytes4","name":"interfaceId","type":"bytes4"}],"name":"supportsInterface","outputs":[{"internalType":"bool","name":"","type":"bool"}],"stateMutability":"view","type":"function"},{"inputs":[],"name":"symbol","outputs":[{"internalType":"string","name":"","type":"string"}],"stateMutability":"view","type":"function"},{"inputs":[{"internalType":"uint256","name":"tokenId","type":"uint256"}],"name":"tokenURI","outputs":[{"internalType":"string","name":"","type":"string"}],"stateMutability":"view","type":"function"},{"inputs":[{"internalType":"address","name":"from","type":"address"},{"internalType":"address","name":"to","type":"address"},{"internalType":"uint256","name":"tokenId","type":"uint256"}],"name":"transferFrom","outputs":[],"stateMutability":"nonpayable","type":"function"},{"inputs":[{"internalType":"address","name":"newOwner","type":"address"}],"name":"transferOwnership","outputs":[],"stateMutability":"nonpayable","type":"function"}]'
// web3のプロバイダを取得
const provider = ((window.ethereum != null) ? new ethers.providers.Web3Provider(window.ethereum) : ethers.getDefaultProvider());

// ウォレットを接続する
export async function connectWallet(_requestName) {
    var requestMethod

    // eth_accountsはReloadで使用。今回はeth_requestAccountsのみ使用。
    if (_requestName == 1) {
        requestMethod = "eth_accounts"
    } else if (_requestName == 2) {
        requestMethod = "eth_requestAccounts"
    }

    // MetaMaskが入っているかチェック
    const { ethereum } = window;
    if (!ethereum) {
        throw new Error("Get MetaMask!")
    }

    // RinkebyのchainIDは4
    let chainId = await provider.getNetwork();
    if (chainId.chainId != 4) {
        throw new Error("Set Network to Rinkeby!")
    }

    // 接続要求
    const accounts = await ethereum.request({ method: requestMethod, });
    console.log("Connected", accounts[0]);

    return accounts[0]
}

// mint呼び出し用。
// トランザクション管理したいところだけど今回は妥協
async function _mintNFT(accout, tokenURI) {
    // 署名付きのコントラクトインスタンスを取得
    const contractInstance = new ethers.Contract(contractAddress, contractAbi, provider.getSigner(0))

    // mintNFTを呼び出す
    contractInstance.mintNFT(accout, tokenURI)

}

// 呼び出し用mint関数 ipfs...はpintaに格納したjsonファイル
export function mintNFT(accout) {
    _mintNFT(accout, "ipfs://QmXF8K3ABsat9kMpqSwMWG2tG2GtnrtoVMJJTK4oJw1fzw")
}
2行目 ethersをimport
5行目 contractAddress は、DOTENVで指定したアドレスを指定する
7行目 contractABI は、plygonscanのコントラクトタブ下部の Contract ABI の文字列をコピーする
https://rinkeby.etherscan.io/address/0x55D48E856DB1933A2F63d30eb0055b8840B1B165#code

12行目 connectWalletはMetaMaskがインストールされているか/Rinkebyネットワークにしているかをチェックし、問題なければアドレスを取得する
53行目 mintNFTは外部から呼び出される用のfunction. ipfsはPintaに登録した nft-metadata.json のCIDを指定する
43行目 _mintNFTは内部呼び出し用のfunction. 署名付きインスタンスを取得してmintNFTを呼び出す
表示の実装
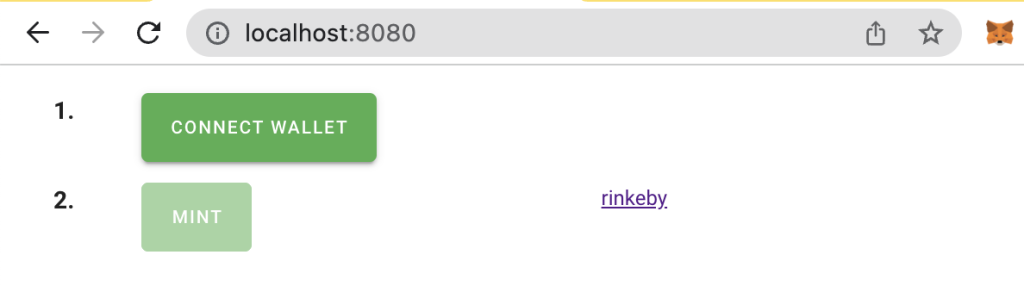
簡素な画面。compornents配下に作成した MintNft.vue に手を加える。
最初に 1.CONNECT WALLET で connectWallet を呼び出す。
問題なくアドレスが取得できれば、2.MINTを活性化する
アドレスが取得できると以下のようになる
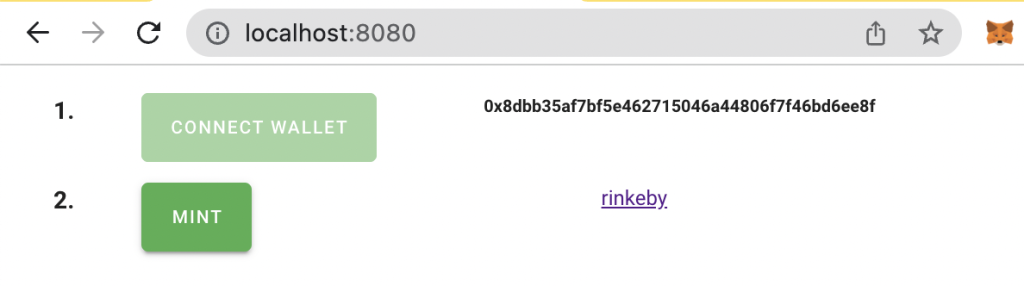
MINTをクリックすると mintNFTを呼び出す。
MintNft.vue (説明省略)
<template>
  <v-container>
    <v-row class="text-center">
      <v-col cols="1">
        <h3>1.</h3>
      </v-col>
      <v-col cols="3">
        <v-btn :disabled="isLogin" @click="connectWallet" color="success">
          Connect Wallet
        </v-btn>
      </v-col>
      <v-col cols="3">
        <h5>{{ walletAddress }}</h5>
      </v-col>
    </v-row>
    <v-row class="text-center">
      <v-col cols="1">
        <h3>2.</h3>
      </v-col>
      <v-col cols="3">
        <v-btn :disabled="cannotMint" @click="mintNft" color="success">
          Mint
        </v-btn>
      </v-col>
      <v-col cols="3">
        <h5>{{ resultMessage }}</h5>
        <a href="https://rinkeby.etherscan.io/address/0x55D48E856DB1933A2F63d30eb0055b8840B1B165"
        target="_blank">rinkeby</a>
      </v-col>
    </v-row>
    <v-row class="text-center">
      <v-col cols="12">
        <v-alert v-if="errorMessage" type="error">
          {{ errorMessage }}
        </v-alert>
      </v-col>
    </v-row>
  </v-container>
</template>

<script>

import * as connectContract from '../contract/connectContract'

export default {
  name: 'MintNft',

  data: () => ({
    walletAddress: "",
    isLogin: false,
    cannotMint: true,
    errorMessage: "",
    resultMessage: ""
  }),

  methods: {
    connectWallet: async function () {
      try {
        this.walletAddress = await connectContract.connectWallet(2)
        this.isLogin = true
        this.cannotMint = false;
      } catch (error) {
        console.log(error)
        this.errorMessage = String(error)
      }
    },
    mintNft: async function () {
      try {
        connectContract.mintNFT(this.walletAddress)
        this.resultMessage = "Check the result on ehterscan."
      } catch (error) {
        console.log(error)
        this.errorMessage = String(error)
      }
    }
  }
}
</script>
MINT結果
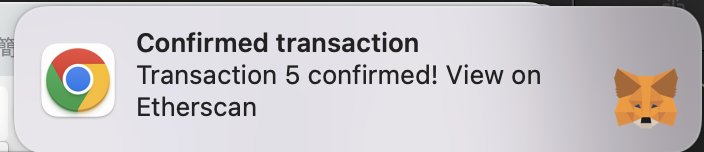
MINTボタンを実行すると、Metamaskのガス代確認画面が表示されるので確認をクリックする。
(拒否した際の振る舞いもちゃんと実装すべきだけど今回は割愛しています。。)
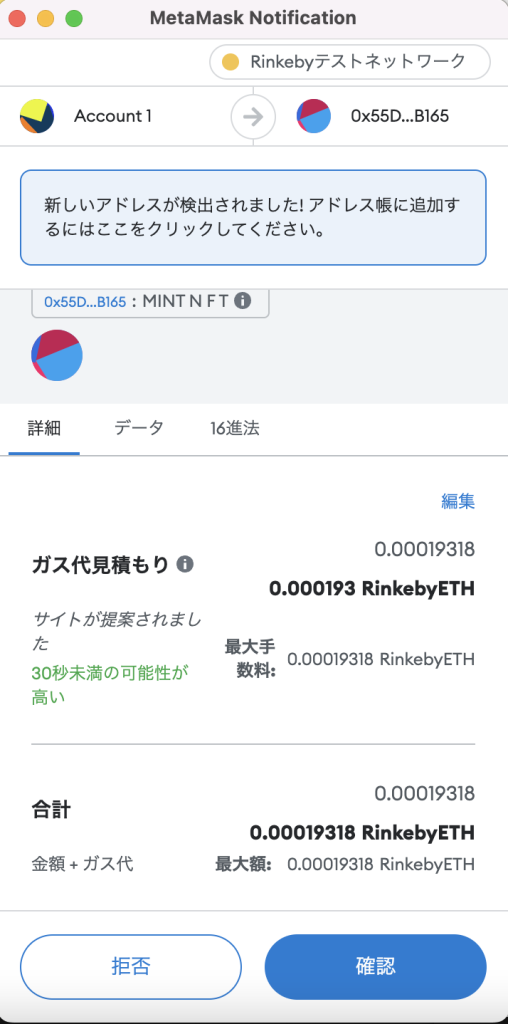
しばらくすると以下のようにトランザクションが完了したと表示される
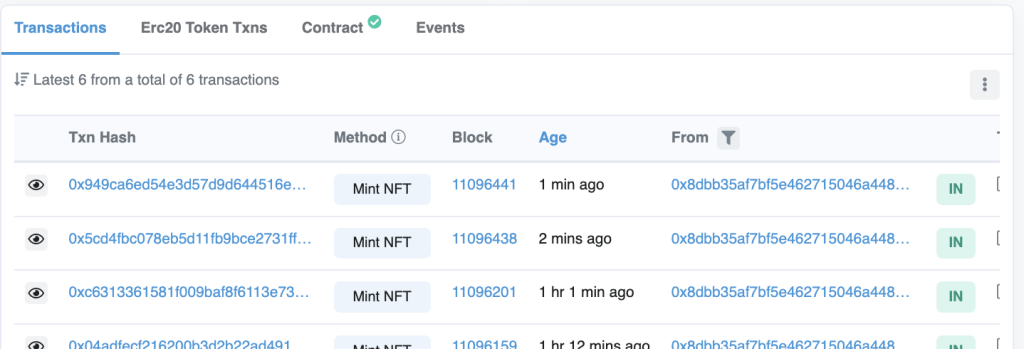
Rinkebyのscan画面で見ると、ちゃんとトランザクションが追加されている
https://rinkeby.etherscan.io/address/0x55D48E856DB1933A2F63d30eb0055b8840B1B165
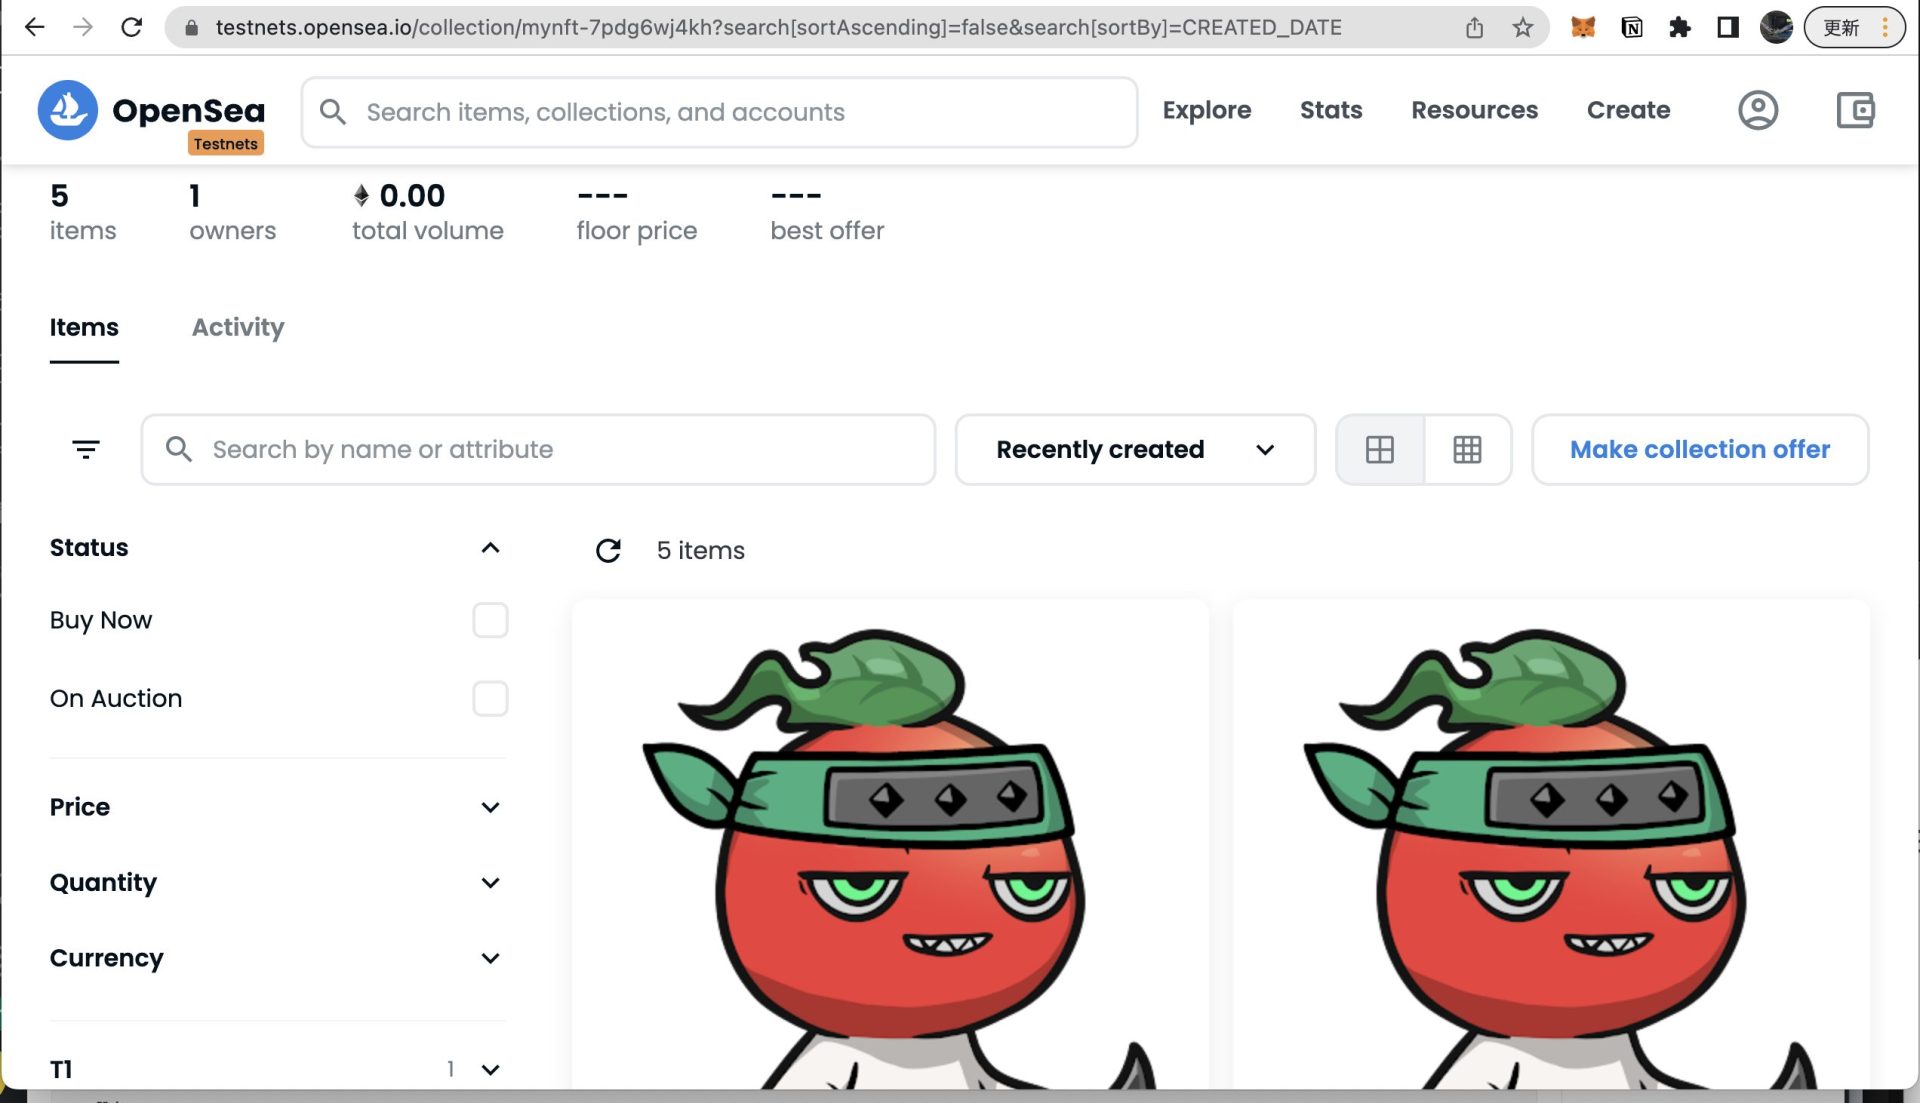
Openseaのテストネットでも表示されることを確認
https://testnets.opensea.io/collection/mynft-7pdg6wj4kh

まとめ
これまでの適当に環境構築して、適当に開発していた内容を改めて整理。
とにかくいろんなフレームワークやらプラットフォームやらがたくさんあり過ぎたので、一通り網羅する内容になったのが良かった。
次は、まだやったことのないgithubへの登録も追加していきたい。
コメント